
In the contemporary landscape of virtual communication and digital collaboration, the ability to record a PowerPoint presentation is a skill that empowers professionals, educators, and content creators alike. Whether you’re delivering a remote lecture, hosting a webinar, or creating instructional content, the flexibility to capture and share your presentations can significantly enhance your impact. In this comprehensive guide, we’ll explore the three best ways to grabar una presentación de PowerPoint, each offering unique features and tailored processes to cater to diverse needs.
Introduction to Microsoft PowerPoint: The Presentation Powerhouse
Before delving into the methods of recording PowerPoint presentations, let’s briefly introduce Microsoft PowerPoint, the go-to software for creating dynamic and visually appealing presentations. PowerPoint is part of the Microsoft Office suite and is widely used for creating slideshows that incorporate text, images, charts, and multimedia elements. Its user-friendly interface and versatile features make it a staple tool for professionals and educators worldwide.
Now, let’s explore the three best ways to record your PowerPoint presentations:
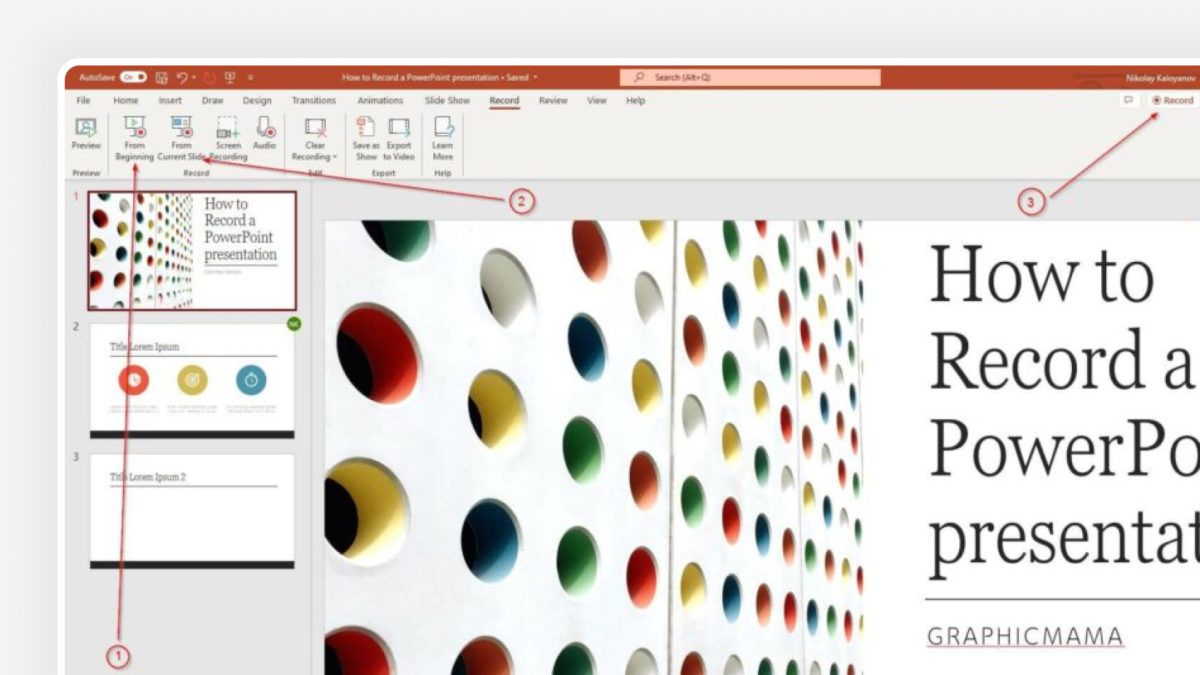
1. PowerPoint’s Built-in Recording Feature: Seamless Integration
Advantages:
- Ease of Use: The built-in recording feature in PowerPoint is an integral part of the software, requiring no additional downloads or installations. This seamless integration ensures a hassle-free experience for users familiar with the PowerPoint environment.
- Slide Transition Control: PowerPoint’s recording feature allows users to control slide transitions, narration, and timing directly within the program. This ensures that your presentation flows smoothly, with each slide appearing as intended.
Steps to Record with PowerPoint’s Built-in Feature:
- Open your PowerPoint presentation.
- Navigate to the “Slide Show” tab on the ribbon.
- Click on the “Record Slide Show” dropdown menu.
- Choose whether to start recording from the beginning or from the current slide.
- The recording toolbar will appear. Click the red record button to start recording.
- Narrate your presentation as you advance through the slides.
- Once done, click the square stop button on the recording toolbar.
- Save your presentation, including the recorded timings and narrations.
Disadvantages:
- Limited Editing Capabilities: While convenient for capturing the presentation, PowerPoint’s built-in recording feature offers limited post-production editing capabilities. Users requiring extensive editing may find it lacking.
- Output Format Options: The output format options may be somewhat restrictive compared to dedicated screen recording software. Users seeking specific file formats may need to convert the recorded presentation after the fact.
2. iTop Screen Recorder: Streamlined Simplicity
Advantages:
- User-Friendly Interface: iTop Screen Recorderstands out for its simplicity and user-friendly interface. It offers an intuitive experience, making it accessible for users of all skill levels, including those new to screen recording.
- Efficient Recording: Designed to be lightweight, iTop Screen Recorder ensures efficient recording without taxing system resources. This ensures a smooth recording experience even on less powerful hardware.
- Annotation Tools: Enhancing the recording process, iTop Screen Recorder includes annotation tools. Users can add highlights, text, or drawings directly to their PowerPoint presentations, emphasizing key points and providing additional context.
Steps to Record with iTop Screen Recorder:
- Download and install iTop Screen Recorder on your computer.
- Open iTop Screen Recorder and select the “Record” option.
- Choose the area of your screen to capture, including the PowerPoint presentation.
- Configure audio settings, ensuring your narration is captured.
- Start recording and deliver your PowerPoint presentation.
- Once done, click the stop button in iTop Screen Recorder.
- Save your recording and choose the output format.
- Optionally, use external editing software for more advanced edits.
Disadvantages:
- Basic Editing Features: While excelling in recording capabilities, iTop Screen Recorder has more limited editing features compared to dedicated video editing software. Users seeking advanced post-production editing may need to supplement their workflow with additional tools.
- Not Ideal for Advanced Editing: Users with requirements for complex video editing features may find iTop Screen Recorder better suited for straightforward recording tasks rather than extensive post-production work.
3. Camtasia: Professional-grade Recording and Editing
Advantages:
- Robust Editing Suite: Camtasia is a professional-grade screen recording and video editing software known for its powerful editing suite. It caters to users who require more than basic recording capabilities, providing sophisticated post-production editing features.
- Simultaneous Screen and Webcam Recording: One standout feature of Camtasia is its ability to capture both the PowerPoint presentation and the presenter through webcam recording simultaneously. This adds a personal touch to presentations and enhances engagement.
- Audio Enhancement: Camtasia includes audio editing tools that allow users to enhance the audio quality of their presentations. This ensures clear narration and optimal sound quality.
Steps to Record with Camtasia:
- Download and install Camtasia on your computer.
- Open Camtasia and select the “Record” option.
- Choose the area of your screen to capture, including the PowerPoint presentation.
- Enable webcam recording if you want to include yourself in the presentation.
- Start recording and deliver your PowerPoint presentation.
- Once done, click the stop button in Camtasia.
- Use Camtasia’s editing features to enhance your recording.
- Save and export your final presentation.
Disadvantages:
- Cost: Unlike free or built-in options, Camtasia comes with a price tag. Users on a tight budget may find the cost prohibitive.
- Learning Curve: The extensive features of Camtasia can result in a steeper learning curve for beginners. Users new to video editing might need some time to familiarize themselves with the software.
Conclusion
Choosing the best method to record your PowerPoint presentation ultimately depends on your specific needs, preferences, and level of expertise. If you prioritize simplicity and integrated functionality, PowerPoint’s built-in recording feature may be sufficient. For those seeking professional-grade editing capabilities and additional features, Camtasia offers a comprehensive solution. If streamlined simplicity and efficiency are paramount, iTop Screen Recorder stands out as a user-friendly option.